 Pin It
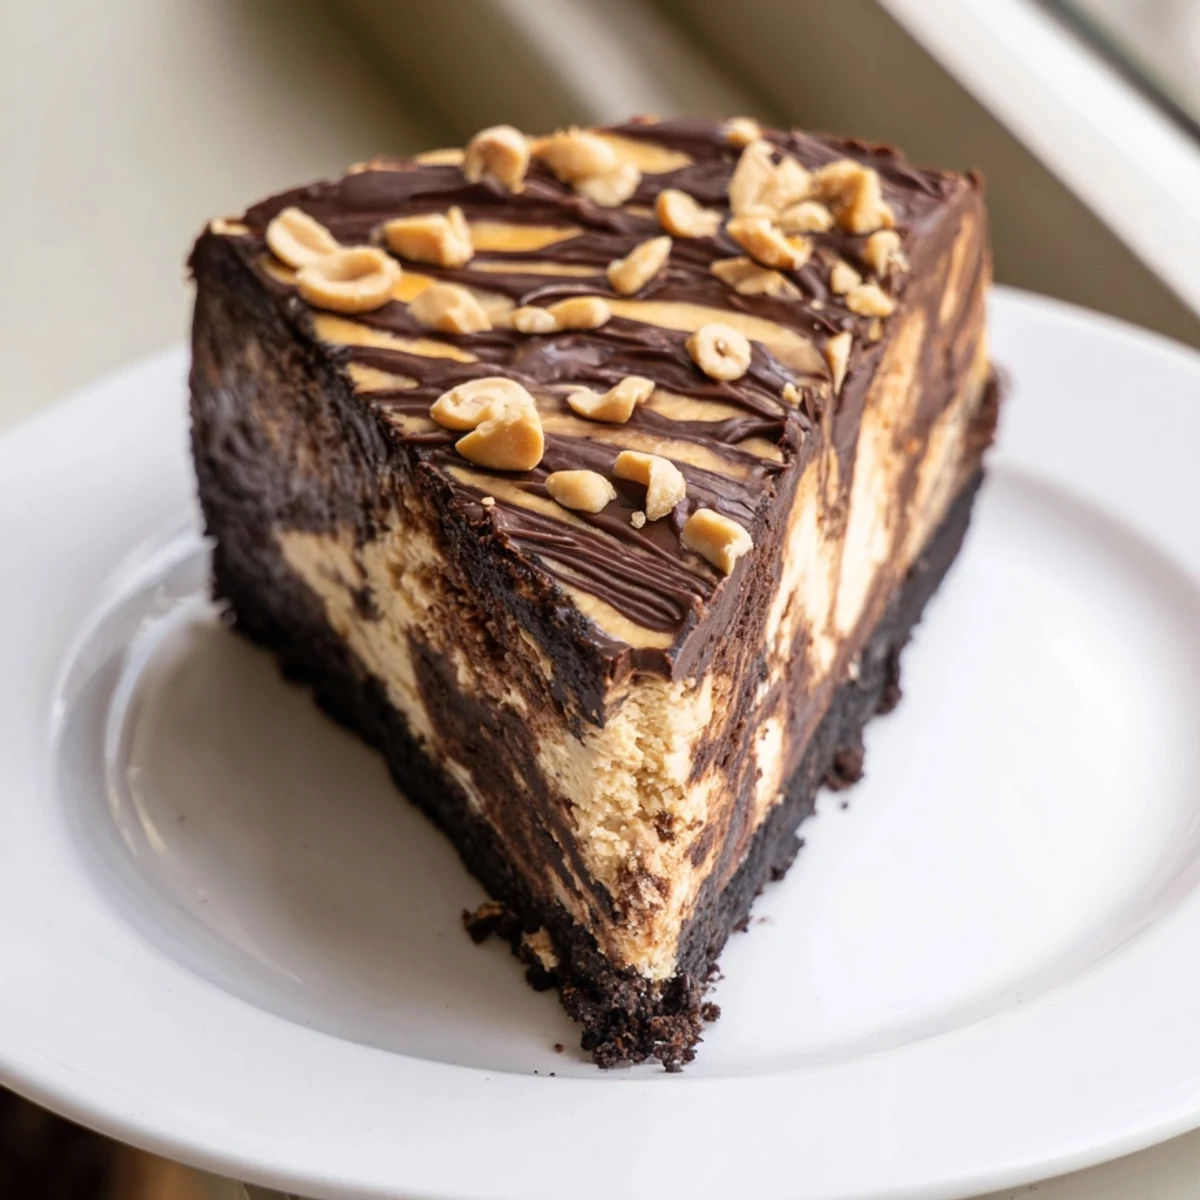
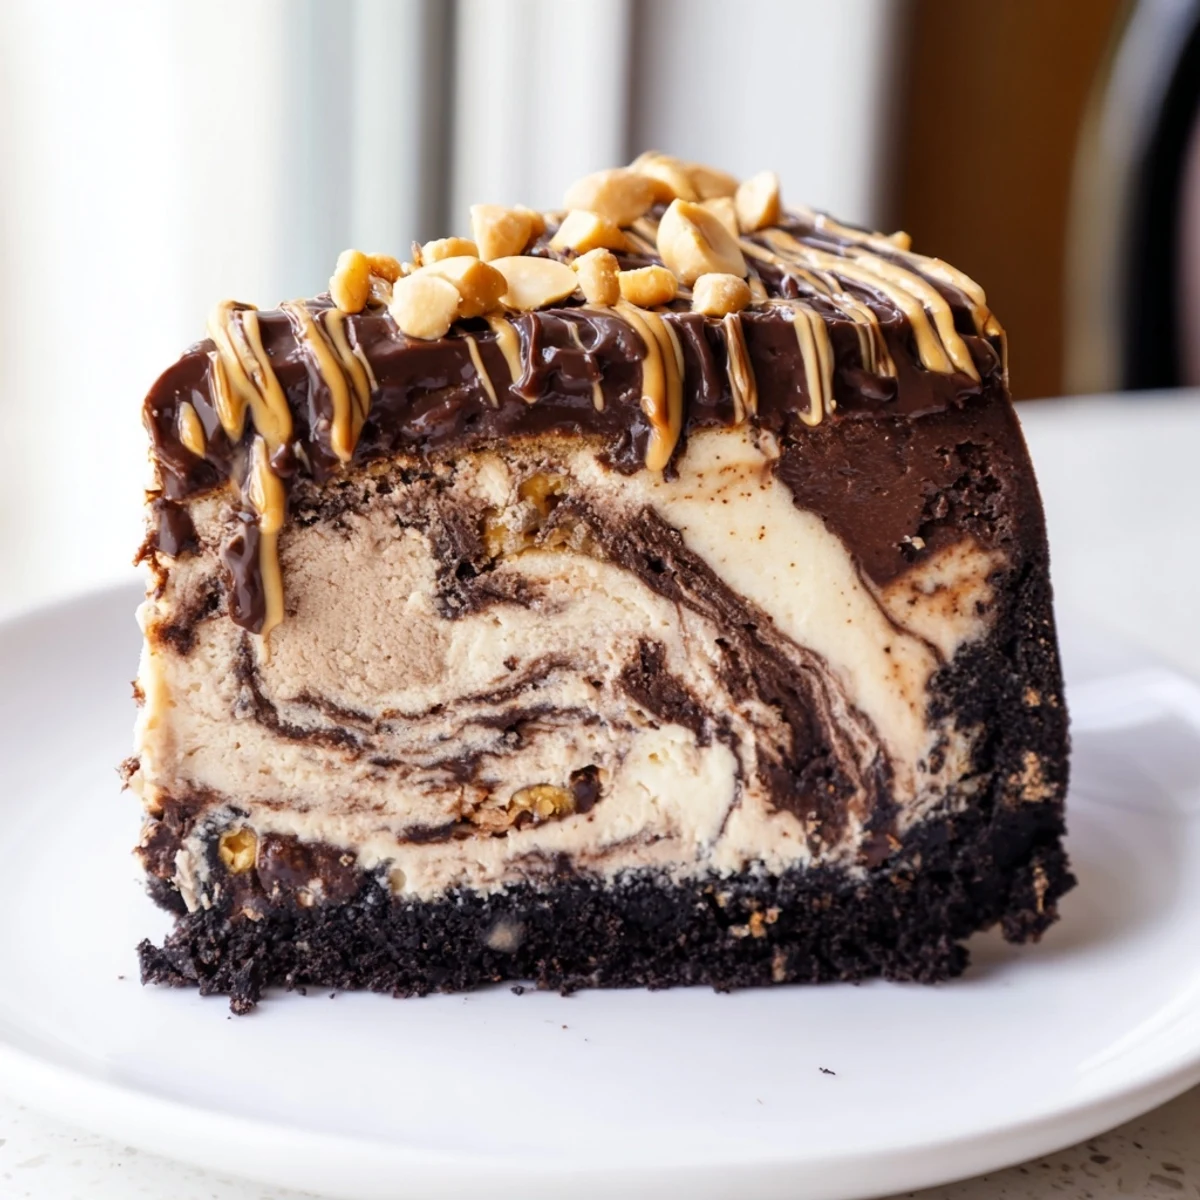
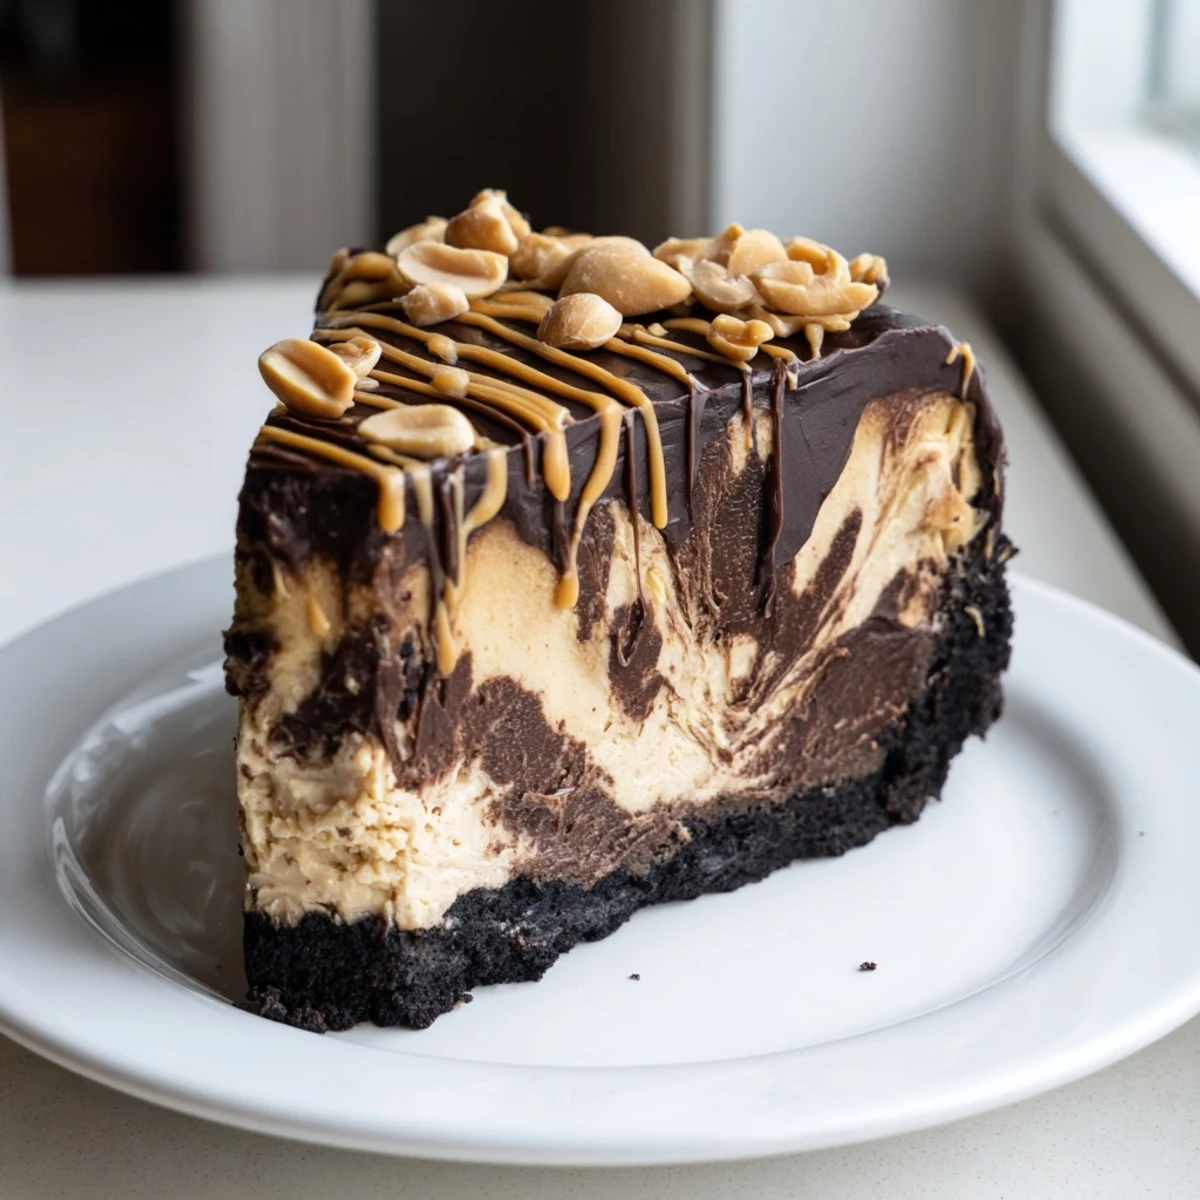
 This chocolate peanut butter cheesecake layers a crunchy Oreo cookie crust with a rich, swirled filling of dark chocolate and smooth peanut butter cream cheese.
The marbled effect is achieved by dividing the filling and combining the two halves with a gentle knife swirl before baking. After a slow bake and overnight chill, it's finished with a glossy chocolate peanut butter ganache.
Each slice delivers 480 calories of pure indulgence, making it ideal for celebrations, holidays, or any occasion that calls for a showstopping dessert.
The smell of melted dark chocolate and roasted peanuts drifting through my apartment on a rainy Saturday afternoon is what convinced me this cheesecake was worth every bit of effort. My sister called it dangerous after her first bite and then quietly went back for a second slice before I even put the kettle on. Something about the way the marbled top cracks slightly as it sets makes you feel like you made something truly special.
I brought this to a friends potluck dinner expecting it to be one of many desserts on the table but it disappeared before the main course was even finished cooling. Someone actually asked if I had bought it from a bakery and I pretended to be offended but honestly it flattered me more than it should have.
Ingredients
- Chocolate sandwich cookies (200 g): The crust needs that slight bitterness from the chocolate cookie to balance the sweet filling so do not swap in graham crackers unless you want a noticeably sweeter base.
- Unsalted butter (60 g), melted: Binds the crumbs together and adds richness without overpowering the cookie flavor.
- Cream cheese (600 g), softened: Leave it out on the counter for at least an hour because cold cream cheese will leave you with lumps no amount of mixing can fix.
- Smooth peanut butter (200 g): Use a commercial brand like Skippy or Jif since natural peanut butter separates and makes the texture greasy.
- Granulated sugar (200 g): Sounds like a lot but the cream cheese and sour cream mellow it out beautifully.
- 3 large eggs: Added one at a time on low speed to keep the batter silky and avoid incorporating too much air.
- Vanilla extract (1 tsp): A quiet background note that rounds out both the chocolate and peanut butter.
- Sour cream (120 ml): The secret to a dense creamy texture that never feels heavy or dry.
- Dark chocolate (100 g for filling, 120 g for topping), melted: Go for something around 60 to 70 percent cacao for the right balance of bitterness and sweetness.
- Heavy cream (120 ml): Heated until just steaming to create a silky ganache without scorching the chocolate.
- Creamy peanut butter (2 tbsp for topping): Stirred into the ganache for a layered finish that ties the whole cake together.
- Chopped roasted peanuts (optional): A crunchy garnish that adds texture contrast and looks beautiful on top.
Instructions
- Build the crust foundation:
- Crush the cookies into fine crumbs using a zip top bag and a rolling pin or a quick pulse in a food processor then mix with melted butter until the texture resembles wet sand. Press firmly and evenly into the bottom of your prepared springform pan and bake for 10 minutes until fragrant and just set.
- Start the creamy base:
- Beat the softened cream cheese and sugar together in a large bowl until completely smooth and lump free scraping the sides and bottom at least once. Add the peanut butter and mix until evenly incorporated and the batter looks uniformly golden.
- Add the eggs gently:
- Pour in the eggs one at a time with the mixer on its lowest setting letting each disappear fully before adding the next. Stir in the vanilla and sour cream by hand or on low until just combined.
- Create the two batters:
- Split the filling into two equal halves in separate bowls. Fold the melted and slightly cooled dark chocolate into one half stirring until no pale streaks remain.
- Layer and swirl:
- Pour the chocolate batter over the cooled crust and spread it flat then spoon the peanut butter batter on top in gentle dollops. Drag a butter knife through the layers in a loose figure eight pattern three or four times for a natural marble effect.
- Bake low and slow:
- Place the cheesecake in the center of a 160 degree Celsius oven and bake for 50 to 60 minutes until the edges are puffed and set but the center still wobbles like gelatin when you gently shake the pan. Resist the urge to overbake because it continues to set as it cools.
- Cool with patience:
- Turn the oven off crack the door open and leave the cheesecake inside for one full hour to prevent sudden temperature changes that cause cracks. Then transfer to the refrigerator for at least 4 hours or preferably overnight.
- Finish with ganache:
- Heat the cream in a small saucepan until it steams then pour it over the chopped chocolate and stir until glossy and smooth. Beat in the peanut butter let it cool slightly and spread it over the chilled cheesecake before adding chopped peanuts if you like.
 Pin It
 There is something deeply satisfying about loosening the springform ring after hours of waiting and seeing the pristine edges of a cheesecake you built from crumbs and cream cheese. It feels less like baking and more like a small act of faith rewarded.
How to Serve It Without Rushing
Pull the cheesecake from the refrigerator about 20 minutes before you plan to slice it so the ganache softens slightly and the filling reaches its creamiest texture. A sharp knife dipped in hot water and wiped clean between each cut gives you those clean bakery style edges that make every slice look intentional.
Adapting for Dietary Needs
Gluten free chocolate sandwich cookies work beautifully in the crust and most stores carry them now so no one has to miss out. If peanut allergies are a concern sunflower seed butter can replace peanut butter in both the filling and topping though the flavor shifts to something earthier and slightly less sweet.
Storing Leftovers Properly
Cover any leftover cheesecake tightly with plastic wrap or transfer slices to an airtight container and it stays wonderful in the refrigerator for up to five days. The ganache topping actually firms up nicely overnight making day two slices arguably even better than day one.
- Freeze individual slices wrapped tightly in plastic and foil for up to two months.
- Thaw frozen slices in the refrigerator overnight rather than at room temperature.
- Always keep the cheesecake chilled until shortly before serving for the best texture.
 Pin It
 Every time I make this cheesecake I learn something small and every time someone new tastes it they close their eyes on the first bite. That quiet moment of enjoyment is really the whole reason to bake anything at all.
Recipe Questions & Answers
- → Can I make this cheesecake ahead of time?
-
Yes, this cheesecake actually benefits from being made ahead. It needs at least 4 hours of chilling, but refrigerating overnight yields the best texture. It will keep well in the fridge for up to 5 days covered tightly.
- → Why does the cheesecake need to cool slowly in the oven?
-
Cooling the cheesecake slowly with the oven door cracked prevents cracks from forming on the surface. A gradual temperature change allows the filling to set gently without contracting too quickly.
- → Can I use crunchy peanut butter instead of smooth?
-
You can substitute crunchy peanut butter, but the filling will have small peanut pieces throughout, which changes the silky texture. Smooth peanut butter is recommended for the creamiest result.
- → How do I get a clean marble swirl effect?
-
Pour the chocolate layer first, then spoon dollops of the peanut butter layer on top. Use a knife or skewer to gently drag through the batter in figure-eight motions. Avoid over-swirling or the two layers will blend into one color.
- → Can I freeze this cheesecake?
-
Yes, this cheesecake freezes well. Wrap individual slices or the whole cheesecake tightly in plastic wrap, then foil. Freeze for up to 2 months. Thaw overnight in the refrigerator before serving.
- → What can I substitute for the Oreo cookie crust?
-
You can use any chocolate cookie or graham crackers combined with melted butter. For a gluten-free version, simply swap in your favorite gluten-free chocolate cookies.